
TRIVETOLOGY
Collecting, cleaning, displaying, researching, and appreciating TRIVETS and related go-withs!
Caring for cast iron trivets

Different metals require different care. In this blog post I’ll be sharing my methods for cleaning, polishing and seasoning CAST IRON trivets.
Most everything you’ll need can be found at your local hardware store. The general rule is to begin with the gentlest method possible and progress from there. Always wear goggles whenever you’re working with cleaning products that have the potential to splash. Wear old clothes, an apron, and don’t forget your gloves!
DISCLAIMER
The following information is offered from my personal experience with no liability or responsibility on my part. Use at your own risk!
☆ Warning: The preservation of patina is always a consideration when dealing with antique metalware. Some methods of rust removal can alter the appearance of cast iron. Weigh your options carefully before proceeding.
INITIAL INSPECTION
Congratulations! You’ve just acquired one or more cast iron trivets. Before cleaning begins, it’s crucial to:
1. Verify the type of metal. A magnet sticks to cast iron; it won’t stick to other metals like brass, bronze, aluminum, copper or nickel.
2. Check for signs of Age and Damage.
3. Attempt to identify the design, maker and era. See my blog posts on Antique, Vintage and Contemporary Trivets.
4. Look for flaking or glints of silvery-grey color that might suggest the trivet has a nickel-plated finish.
5. Determine if there’s evidence of original paint, which you might decide to preserve.
BASIC CLEANING
Brush off any excess dirt and cobwebs; then wash in soap and water to remove surface dirt. Goo Gone® is good at removing grease or adhesive tag residue. Dry well, then go to the next step.
POLISHING
If you acquire a cast iron trivet that’s in excellent condition, all that’s needed may be a gentle cleaning and polishing. Glorifying Antique Furniture Polish is a citrus and beeswax polish designed for wood, but it’s also great for polishing and protecting decorative cast iron. Lightly apply the polish to a clean and dry trivet, let it sit for about 15 minutes, then wipe off and buff to a beautiful shine. The trivet is now ready for display and doesn’t require any further seasoning or electrolysis.
This method is especially appropriate for cast iron trivets with enamel, japanning or glitter ~ finishes that don’t tolerate heat or electrolysis.
☆ Warning: Glorifying Antique Polish is not to be used on cast iron used for cooking
NICKEL-PLATED FINISHES
A nickel-plated trivet requires special handling and it’s not always possible to restore one to display readiness. The best advice I can give is to avoid any trivet with a damaged plating.
If you find a rusty, plated trivet, you’re going to have difficulty safely cleaning that trivet. Avoid abrasive methods as they can scratch the plating and cause more plating loss. Start with a basic cleaning, followed by a gentle buffing with a polish specifically made for nickel. I personally prefer to use Flitz Polish.
There’s an alternative school of thought … some collectors decide to sand blast the plated finish off, then season the bare cast iron. It’s your decision.
FYI: Nickel re-plating is more commonly seen with antique stove restorations, but it’s also possible to re-plate a trivet. You can learn more about this process in my blog post Replating my Queen Spirit stove.
REMOVING PAINT
Ugh! It’s amazing the condition trivets are found in. Some have been painted to achieve a shabby-chic effect, while others have been intentionally covered with paint to disguise cracks, rust and pitting. Buyer Beware!
If the paint is not original to the trivet and you decide to remove it, select a paint remover specifically designed for removing paint from metal. You’ll need special chemical-resistant gloves; the other types can sometimes dissolve when exposed to the paint remover. Choose a thicker solution which can be brushed or sprayed on; it will cling to the trivet surface better than a thinner liquid.
Follow all product directions carefully, as these chemicals can be harmful if misused. Be sure to work in a well-ventilated area. Also, don’t forget the proper gloves and eye protection! When you finish, thoroughly wash and dry your trivet.
REMOVING RUST
You’ll need a few tools: a steel wire brush (it looks like toothbrush), a Brillo® pad or some fine steel wool, and Bon Ami® Powder Cleanser.
Begin scrubbing, giving extra attention to the rusty areas, and continue to scrub until your rinse water runs clear and the trivet is cleaned to your satisfaction. I like to use Bon Ami® because it’s gentle, effective, and I can gauge my progress in rust removal by the color of the wet powder.
Some people swear by oven cleaner as an easier method for removing old grime and rust. Choose a product like Easy Off® that doesn’t require heat. Using gloves, apply a thick, even coat of oven cleaner to the trivet, then place in an airtight plastic bag overnight. At the end of that time, use your steel wire toothbrush or Brillo® pad under running water and scrub the trivet until clean. If necessary, reapply and repeat the process.
☆ Warning: Never use oven cleaner on aluminum; it pits and discolors the metal.
☆ Warning: Avoid the use of Naval Jelly® because it tends to leach the color from cast iron, leaving it an ashen color.
Dremel® is a brand of small rotary tool that uses different attachments to grind and polish. With the correct bit you can get into the small crevasses that so often resist rust removal. Be sure to wear goggles, gloves and long sleeves to protect your eyes and skin from little pieces of the wire brush and bits of rust that will be scattered. Once finished, proceed to the next step.
SEASONING
What exactly is seasoning? It’s a thin layer of oil, baked onto the iron, that prevents rust. Here is my method of seasoning trivets.
1: Wash each trivet well in warm soapy water.
2: Remove any surface rust.
3: Dry each trivet well.
4: Preheat the oven to 300 degrees Fahrenheit.
5: Coat each trivet with liquid cooking oil, solid shortening, or mineral oil.
6: After 15 minutes, carefully wipe off the oil.
7. There may be an odor while the trivets bake, so open a window.
8. Space the trivets on oven racks; avoid overlapping.
9: Bake in the oven for 1 hour.
10: Remove from oven and cool on a baking rack.
☆ Warning: Oven seasoning is NOT recommended for any trivet that has glitter, a japanned finish, or that’s been accent painted because heat can destroy the finish. Polish instead.
E-TANK ~ ELECTROLYSIS
I’ll have to admit I feel most comfortable using old-school methods in cleaning and caring for my trivets. However, there are those who swear by electrolysis, using an E-Tank. If you’re interested in learning about the process, check out this great video Restoring Cast Iron Using Electrolysis.
☆ Warning: It is not recommended to clean plated metalware in an E-Tank.
Gallery
Clicking the first image will open a Slideshow. There are controls at the bottom of each screen to enlarge the image to full resolution. Click again (+) to zoom in.
-
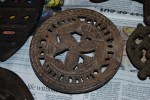
- Before: An Isle of Man trivet, dirty and rusty, but without obvious pitting. The trivet is in good shape otherwise, without cracks or other damage.
-

- These cast iron trivets need cleaning and seasoning before they will be display ready.
-
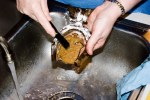
- Using a steel wire brush, cleansing powder and water to scrub away rust. Notice how the white powder turns orange as the rust is lifted.
-
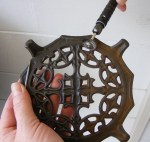
- A Dremel comes in handy for removing rust from crevases.
-

- Seasoning a batch of trivets in the oven.
-
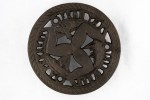
- After: The same Isle of Man trivet, now cleaned, seasoned & ready for display. Note the lettering around the edge: A PRESENT FROM THE ISLE OF MAN.
I value my readers!  Click below to become a Trivetology Follower. Then you'll receive an email notification of each new blog post.
